IBM B2B Integrator in Docker Setup Instructions
Contents
Pre-requisites (Tutorial Specific)
Application Server Details (Tutorial)
Database Server Details (Tutorial)
Encrypt B2Bi Database Password
Prepare Setup Configuration File
Container Status (After Setup)
Starting/Stopping B2Bi Container
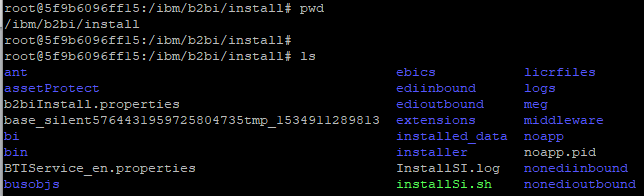
B2Bi install directory (in the container)
Pre-requisites (Tutorial Specific)
1. Application Server with CentOS (v.7.5 used for the tutorial)
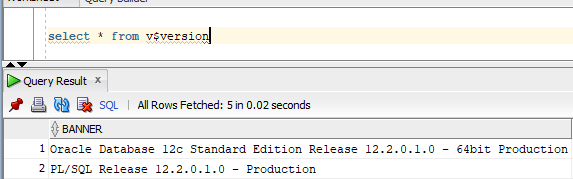
2. Database Server with Oracle 12c R2 (standard edition use for the tutorial)
3. B2Bi Docker Image
4. Oracle JDBC Driver
5. Oracle user account
6. JCE Library
Application Server Details (Tutorial)
A Linux CentOS 7.5.x server was used to host the B2Bi docker image/container.

Database Server Details (Tutorial)
Oracle 12c R2 server was used as the database server.
High Level Tasks
Here are the high level tasks required for setting up B2Bi in Docker:
1. Download the B2Bi Docker Image
2. Encrypt B2Bi passphrase
3. Encrypt B2Bi Database password
4. Prepare B2Bi configuration file
5. Load B2Bi docker image
6. Setup B2Bi Database
7. Configure B2Bi
8. Start/Stop B2Bi
9. B2Bi user interface access
10. B2Bi Docker Container Access
Download B2Bi Docker Image
Download the B2Bi docker image from IBM Passport Advantage.

Encrypt B2Bi Passphrase
Using the default encryption key, generate the B2Bi passphrase (gL3w0Sj0wZrTfqm0K1ry4Q==). Save the passphrase as it will be needed for constructing the setup configuration file.
Passphrase used -> apppassword
Encrypted passphrase -> gL3w0Sj0wZrTfqm0K1ry4Q==

echo b2bi | openssl enc -aes-256-ecb -e -a -K 4254514F6C6C2B594650496373422B764D66584E54673D3D
Encrypt B2Bi Database Password
Using the default encryption key, generate the B2Bi passphrase (8J6BLZJrx/XvVMb8Yh9YYg==). Save the passphrase as it will be needed for constructing the setup configuration file.
Database password used -> dbpassword
Encrypted database password -> 8J6BLZJrx/XvVMb8Yh9YYg==

echo dbpassword | openssl enc -aes-256-ecb -e -a -K 4254514F6C6C2B594650496373422B764D66584E54673D3D
Encryption instructions are available at
Prepare Setup Configuration File
The setup.cfg file contains the information that is required to configure the B2Bi container. Create the setup.cfg file and place it in the same folder as the database jar file on the server on which you will install Sterling B2B Integrator.
B2Bi documentation provides a sample setup.cfg file that has to be tailored for each environment. Below are the salient sections of the setup.cfg file used for the tutorial:
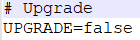
Upgrade flag
License Info

Security configurations

Note the use of the word “ENCRYPTED” followed by a colon before the encrypted password text for the system passphrase.
Initial or base port

Database attributes
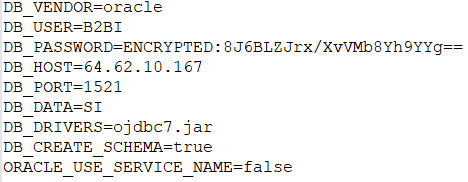
Note the use of the word “ENCRYPTED” followed by a colon before the encrypted password text for the database password.
Email Info

JCE Location

* Other flags present in the sample setup configuration file were not modified.
The IBM documentation about the setup configuration file is available at https://www.ibm.com/support/knowledgecenter/en/SS3JSW_6.0.0/installing/installing/integrator/SI_Creating_setupcfg.html
A copy of the setup configuration file is available at Setup.cfg.
Load B2Bi Docker Image
Run the docker load command to load the B2Bi docker image into docker as shown below:
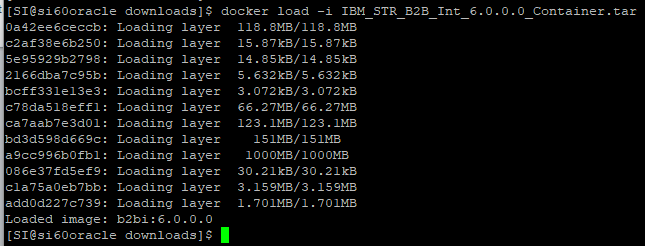
You can verify that the image was loaded by running the following command:

Setup B2Bi Database
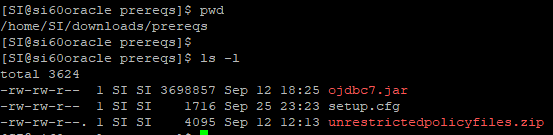
Before running the database setup command, make sure the following files are placed in a folder on the application server machine:
Now run the following command to setup the B2Bi database:

|
Setup Command |
docker run -e LICENSE="accept" -e TZ=America/Detroit -d --name=ProdB2BI --net=host -v /home/SI/downloads/prereqs:/ibm/resources 1bcb26930832 b2bi_setup deploy_db |
|
Image Id |
1bcb26930832 |
|
Command/Flag |
Description |
|
|
|
|
docker run |
Run a command in a container |
|
--env, -e |
Set environment variables |
|
LICENSE |
Environment variable LICENSE set to “accept” |
|
TZ |
Environment variable TZ (time zone) set to “America/Detroit” |
|
--detach, -d |
Run container in background and print container ID |
|
--name |
Name of the container, “ProdB2BI” was used as the container name |
|
--net |
Connect container to a network, used the “host” network |
|
--volume, -v |
Bind and mount a volume from the host to the container. The directory “/home/SI/downloads/prereqs” on the host is mounted inside the container as “/ibm/resources”. This effectively means that the container has access to the “/home/SI/downloads/prereqs” directory and its contents. The directory contents were:
Note: The b2bi_setup command expects the configuration file and the prerequisite libraries to be in the “/ibm/resources” directory. It is necessary to mount a local directory with the above contents as “/ibm/resources” for the setup to work. Also note that the sample setup.cfg does not specify the paths for “DB_DRIVERS” and “JCE_POLICY_FILE” flags because these files are expected to be in the “/ibm/resources” directory.
|
|
B2Bi Image Id |
“1bcb26930832” |
|
Mode |
Options {b2bi_setup | b2bi_run}, select “b2bi_setup” |
|
Action |
deploy_db For mode = b2bi_setup, the only option for the action flag is “deploy_db” |
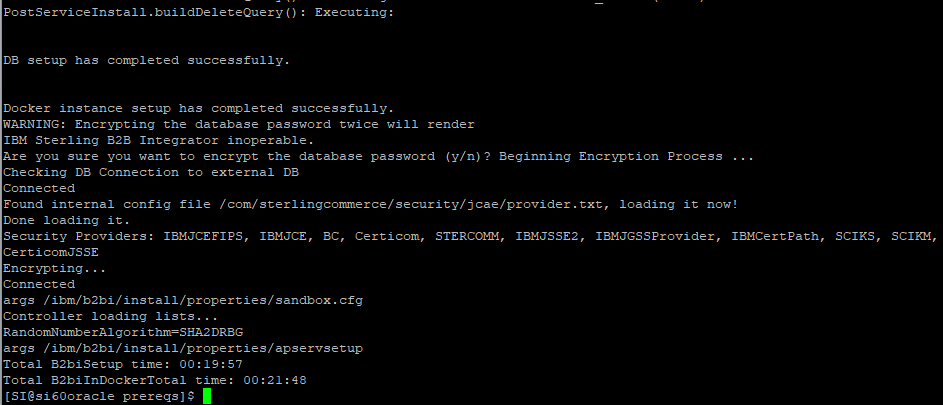
The above command outputs the full container id and returns immediately. You can check B2Bi database setup progress by running the following command:
docker log containerid

Log Check # 1

Log Check # 2

|
[SI@si60oracle ~]$ docker run -e LICENSE="accept" -d --name=ProdB2BI -p 20000:10000 -v /home/SI/prereqs:/ibm/resources b2bi:6.0.0.0 b2bi_run b2bi 1
docker: Error response from daemon: Conflict. The container name "/ProdB2BI" is already in use by container "d224c230628796cd0063b740c36b9f7630f8dfe45ddab49c14e7a8059b9bae8a". You have to remove (or rename) that container to be able to reuse that name. See 'docker run --help'. |
Configure B2Bi
“ProdB2BI” container name was used during the database setup step. Reusing the same container name “ProdB2BI” for the B2Bi setup task requires removing the container created in the previous step. This can be accomplished by performing the following actions:
List containers

Remove container

Setup B2Bi

|
Setup Command |
docker run –e LICENSE=”accept” –d –name=ProdB2BI –p 20000:10000 –v /home/SI/downloads/prereqs:/ibm/resources b2bi:6.0.0.0 b2bi_run b2bi 1 |
|
Container Id |
7eb62dd5fd0ea6a6b10031fc93c011edfa88da3ebd2d9c300e20d1c20196f84a |
|
Command/Flag |
Description |
|
|
|
|
docker run |
Run a command in a container |
|
--env, -e |
Set environment variables |
|
LICENSE |
Environment variable LICENSE set to “accept” |
|
--detach, -d |
Run container in background and print container ID |
|
--name |
Name of the container, “ProdB2BI” was used as the container name |
|
--net |
Connect container to a network, used the “host” network |
|
--publish, -p |
Publish a container’s port to the host. For example,
-p 20000:10000
20000 = B2Bi dashboard port on the host 10000 = B2Bi dashboard port inside the container
Without –p flag (only available inside container) Dashboard URL https://172.17.0.2:10000/dashboard
With –p flag (available at the host level) Dashboard URL https://64.62.10.166:20000/dashboard
Note - Without publishing the port, users will not be able to access the dashboard UI as the dashboard will be inside the container which is firewalled by default. |
|
--volume, -v |
Bind and mount a volume from the host to the container. The directory “/home/SI/downloads/prereqs” on the host is mounted inside the container as “/ibm/resources”. This effectively means that the container has access to the “/home/SI/downloads/prereqs” directory and its contents. The directory contents were:
Note: The b2bi_setup command expects the configuration file and the pre-requisite libraries to be in the “/ibm/resources” directory. It is necessary to mount a local directory with the above contents as “/ibm/resources” for the setup to work. Also note that the sample setup.cfg does not specify the paths for “DB_DRIVERS” and “JCE_POLICY_FILE” flags because these files are expected to be in the “/ibm/resources” directory.
|
|
B2Bi repository and tag name |
b2bi:6.0.0.0 * Use docker images command to figure out the image repository and tag name |
|
Mode |
b2bi_run |
|
Action |
b2bi |
|
Node number |
1 |
Docker deployment parameters - https://www.ibm.com/support/knowledgecenter/en/SS3JSW_6.0.0/installing/installing/integrator/SI_DockerRunParameters.html
The setup progress can be monitored by running the following command:
|
docker logs 7eb62dd5fd0ea6a6b10031fc93c011edfa88da3ebd2d9c300e20d1c20196f84a |
Progress Log -- Check # 1

Progress Log -- Check # 2

Progress Log -- Check # 3

Container Status (After Setup)

Starting/Stopping B2Bi Container
Starting Container
|
Docker start 7eb62dd5fd0e |

|
Docker logs 7eb62dd5fd0e |

Stopping Container
|
Docker stop 7eb62dd5fd0e |

|
Docker logs 7eb62dd5fd0e |

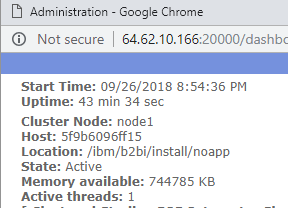
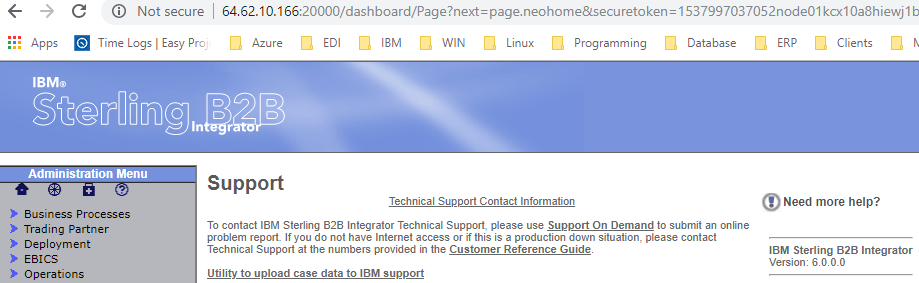
B2Bi User Interface Access
If you used the –p (publish ports) flag during the B2Bi setup, the user interface can be accessed at https://hostname:20000/dashboard/Login. For the tutorial, the URL turned out to be: https://64.62.10.166:20000/dashboard/Login
B2Bi Docker Container Access
Check the container id

Run the following command which will give you a shell inside the container:
|
docker exec -i -t 5f9b6096ff15 /bin/bash |
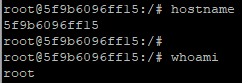
Note that the container id is the same as the host name.
B2Bi install directory (in the container)